Summertime!
I thought it would never come!Okay, the Littles and I are just getting started with this summer long project. Here's what we have so far.
What's in the Fish Net?


Hermit Crabs (on loan from my grandchildren)
Word Wall

There's a world of non-fiction books about beaches and oceans and their inhabitants. Best place to find these books are at thrift stores. There's one in my neighborhood that sells children's books for twenty five cents on a regular day. On half price days I back my car up and fill the trunk! Otherwise, Scholastic Book Clubs carry a variety for the best retail prices.
Fiction Books

A Day at the Seashore by Kathryn and Byron Jackson
or VIEW
Let's Go to the Beach by Nancy Smiler Levinson
Hotter than a Hot Dog! by Stephanie Calmenson
Froggy Learns to Swim by Jonathan London
or VIEW
Amy Loves the Sun by Julia Hoban
One Day at the Seaside by Donna Bryant
Mister Sseahorse by Eric Carle
or VIEW
A House for Hermit Crab by Eric Carle
or VIEW
Ibis, A True Whale Story by John Himmelman
or VIEW
I'm a Manatee by John Lithgow
Or VIEW
Octonauts and the Scary Spookfish (Penguin Young Readers)
or VIEW FULL EPISODE
One Tiny Turtle by Nicola Davies
or VIEW
Somewhere in the Ocean by Jennifer Ward and T. J. Marsh
or VIEW
Commotion in the Ocean by Giles Andreae
or VIEW
The Pout-Pout Fish in the Big-Big Dark by Deborah Diesen
or VIEW or SONG
In the Sandbox


On a recent trip to 5 Below I discovered itty bitty sand pails and tools to go in our miniature sandboxes.

Seven pieces for just a dollar! See the size.


Squirrel!
I also found these adorable gummy bear stickers at 5 Below. I thought they would work well with the gummy bear graphs on the PreKinders sight but they did not, wrong colors. They still work for color sorting and making your own graphs, simple ones, don't need to have bears on them. They are also good for patterning and such. 8- stickers for a dollar! i peeled mine and stuck them to card stock before laminating them.


Interactive felt Board

This next one is my make over of a game MyAwesomeMentor dug up and dusted off to play with the Littles. I loved it so much I spent naptime re-creating it. We are all familiar with Brown Bear, Brown Bear, What Do You See? Right? Now meet White Seagull. Start this game off with just the title and the white seagull and ask, "White seagull, white seagull, what do you see?" Allow the Littles to each choose and add a critter to the board. Then answer, "I see a [color] [critter] looking at me." Until they've all been placed on the board.

Special challenge for FCCP members!
If you are a member of Family Child Care Partnerships and you are one of the first five providers to leave an original activity idea to go along with this theme in the comments below, MyAwesomeMentor will bring a set of "White Seagull" laminated and ready for your felt board to you at conference this July!
Song and Music
Ibis the Whale
Ocean Animal Song (Blippi)
A Hole in the Bottom of the Sea
Under the Sea (PINKFONG)
Baby Shark (PINKFONG)
The Goldfish (Let's Go Swimming) Lauie Berkner
Down By the Bay (The Learning Station)
Three Little Fishies
Art and Activities
Pine cone Puffer fish
Busy little hands but what are they making?


Those little hands are painting a puffer fish!

The fins and tail are trapezoid shaped foam secured with Elmer's Glue.
Jellyfish
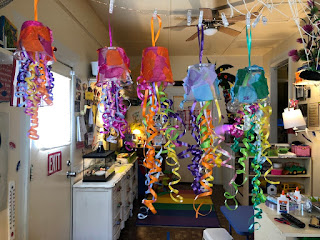
We started with a used (and washed) clear plastic cup. I saw demos of this craft using colored cups, painted cups, and even paper bowl but I thought the clear cup and the sheerness of the tissue paper made a better combo. I used a glue gun point to melt a hole in the bottom of each cup. The Littles glued tissue paper squares purchased at the Dollar Tree all over the outside of the cups. I made streamers of curling ribbon with a loop and pulled the loop up through the hole for tentacles and hanging. Easy peasy!Then I hung them where a fan would make them flutter all day.
Window Cling Sun Catcher
Fill a plastic disposable plate full of glue, add stickers, let dry (an eon), then pull the glue off and you have a sheer sun-catching thingy that is supposed to hold itself to your window. Sounds simple. Sort of.
It took a whole bottle of Elmers clear blue glitter glue to fill this plate. A bottle is roughly $4. Expensive project.

Next time I buy the gallon jug (or whatever size it is), use food coloring, and my own glitter but for now, we have lots of glitter glue.

It took a whole bottle of Elmers clear blue glitter glue to fill this plate. A bottle is roughly $4. Expensive project.

Next time I buy the gallon jug (or whatever size it is), use food coloring, and my own glitter but for now, we have lots of glitter glue.

The instructions I found online said that any stickers would do but that they had chosen glitter foam fish stickers. Wrong, not just any stickers will do. The paper stickers I tried first just rolled themselves up. I didn't have foam stickers but I did have gel window clings. Sounded like a good bet at the time so I used them. Bad, bad idea. I tried them twice before I realized that the glue just peels away from the gel clings as it dries. Now I'm a bottle and a half of glitter glue into this project and the little haven't even got their fingers sticky yet. Take notes, learn from my mistakes. Next, foam stickers. Hobby Lobby is my hero.
This plate only took half a bottle of glue. If I do this again, ll use clear glue, my own glitter, and food coloring. A bit cheaper.


Below is with the gel clings. It will be fine if I leave it attached to the plate. The Littles will use foam stickers. I've got my fingers crossed that it works!

I decided to take one child at a time so I could maintain control over the icky sticky mess a little better. The bottles were hard for the Littles to squeeze so I ended up taking the tops of. That went better.

And they are done! Now they dry for seven days. Probably five is enough but I want to be sure.We found it was easier to leave the paper backing on the sticker. If the sticker is sticky and the glue is sticky it's hard to free the sticker from little fingers.

So they look better wet. They dried much more quickly than I expected them to. In fact, When they were dry they released themselves from the plastic. Problem is they are curled a bit and do not sit on the window as advertised. i'm going to put a small hole in them and dig up some tiny suction cups with hooks to hang them in a window.


The gel one did the same but now the gel is really sticky.

I'm probably not going to repeat this project. If anyone knows how to flatten these out, please make a note in the comments.

And finally! They aren't flat and they din't stick to the window as advertised but a simple hole punch and a suction cup hook and voila!

All along I told myself I was never doing this project again but now that they are hanging and the Littles are so proud of them I think we'll be revisiting this thing this winter with glittery snowy looking glue and snow flakes and. . . . .
Sea Turtles
Another project easy enough for my two year old and still fun for the three year olds. We ate fruit cups for lunch the other day and washed the cups. We painted green on the inside of the cups. Then glued them to a sea turtle shape on green foam. We put googly eyes on EVERYTHING. I wrote each child's name on the bottom side so I could use these to decide who was going to be a helper or who was going to be fist, etc. simply by lifting them and asking whose name was there. My Littles don't recognize their own names well so this is also a good exercise.


There's shell sorting and then there's SHELL SORTING! MyAwesomeMentor played a game with my children using colored pictures of shells. During the course of the game she used different shell names and it got me thinking. We should sort AND name our shells. Wasn't as easy to figure out the names of different type shells as I thought. Different websites give them different names so I went with the one that had good pictures, (Guide to Identifying Sea Shells).

Kind of hard to see the cards. Here, that's better.
We tried rubbings with triangle crayons and differing grades of sandpaper and on the deck -- uh, boardwalk. It wasn't as fun as when a picture appears on the paper like with these Dollar Tree rubbing plates.
Exploring the depths of this ocean of 50K water beads you might find whales, sharks, octopi, crabs, and much much more!

Sun Safety
This theme would not be complete without a little talk about sun protection and a little project to go with it. Foam visors and stickers are fun to keep the Littles attention for that conversation. Don't forget the googly eyes.


To Sunscreen or not to Sunscreen?
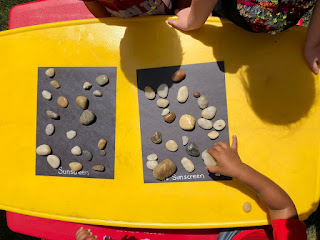
This afternoon MyAwesomeMentor came and read a book to my children about the sun. She helped the Littles make cute little color changing beaded bracelets and performed a sunscreen experiment. We laid two pieces of black construction paper in full sun light for an hour. One with rocks on top. One with sunscreen and rocks on top. Here's how it went.
Then we went back and checked them an hour later. The Littles took the rocks off.
Wow!

Letter/Letter Sound Recognition
I wrote each of the twenty six letters on a scallop shell. We've played several games with these so far.
Each child takes a turn flipping over a shell, identifying the letter, the letter sound, and naming something in the room that starts with that letter/sound. Right now we are working on just identifying the letter name. To make this more challenging and competitive I let the children continue to choose shells for as long as they can name them. The one with the most shells when they are all turned over wins!
We've put the shells in a box of sand to make finding them more interesting. I ask each child to find the letter that their name begins with. Two of my children's names begin with the same letter so they have to race to see who discovers it first.

VIEW Demo by GrandLuke
Octopi
Gather paper towel rolls, glue, pieces of fabric, and of course, googly eyes. Paint the roll with Elmer's Glue and cover with little fabric squares and let dry.


Once dry, cut 2/3 of the way from the bottom up to make eight tentacles (in half, then in half, then in half again). Then bend each leg up accordion style and add googly eyes.

Awesome!

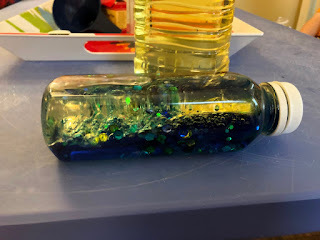
I was really excited about the wave bottle. It was so easy I don't know why I've never done it before.
VIEW!

This is all you need. Start with an empty clear bottle. I choose square because it can sit on it's side. Then a dish of water with a small cup for dipping and pouring, vegetable oil, I used canola but a clear oil would have been better, sequins, glitter, food coloring, and a funnel to make the project easier for the toddlers. Next time I will leave out the glitter and sequins. They don't move like I thought and pretty much just stick to the sides of the bottle.

If you choose to use sequins and glitter it's best to add it first before the funnel gets wet and icky.

Next we added water and food coloring. I instructed the Littles to fill the bottle halfway with water. We had a lot of different ideas about what halfway meant but all did pretty well. Three drops of food coloring was sufficient. We paused after each one to enjoy the swirls the drops made as they blended with the water.

Finally we filled the bottle to the top with oil and screwed the lid on so we could admire our work right away. Later I used E-6000 to make the lid permanent.

WAIT! Above I said I screwed the tops on right away to admire our waves, BIG mistake. Once there's oil on the top the glue wont stick. But of course! You might say but there's a black hole in my brain where such necessary info gets sucked in and is never seen again. So no admiring! Glue that lid immediately and let it dry a few hours at least. We put together our projects right away in the morning and by the time the Little got up from nap the E-6000 was dry enough to play with.
The Grands discovered a wave bottle sitting on a shelf and wanted to make their own this weekend. This time I bought a lighter colored oil, Wesson Canola oil. See the difference? Much More clear. We left out the sequins and added tiny little sea shells.

Stingrays!
Just a paper plate and a paper bowl, some construction paper scraps and a pair of googly eyes (everything has to have googly eyes). The Littles really enjoyed tearing the paper and gluing. They love sticky and icky.

Miniature Aquarium
Found this little aquarium toy at the Dollar Tree. I bought it out of curiosity. How can it grow 400%? I'm no math wiz so it took me a bit to get that means just 4 times their present size.

So I added water.

Let's see how it goes!

They grew! This is five days later.

After twelve days!

Sorting and Graphing
Wonderful sorting and graphing games brought to us by MyAwesomeMentor, printed from PreKinders.com.

Jell-O Play
Thank you Jell-O this looks fun.

More from Jel-O


